In the first part of this tutorial, I discussed how to work with Java DB inside Netbeans and basically how we are going to manually perform database operations. In this section I will show you the way a real java application initiates a Java DB database connection and use for data manipulation within the application.
First you should remove the database connection if it already has a connection.
1. Expand the Database Explorer in the Services window and find your database.
2. Have a look at your database connection node. In my case it is jdbc:derby://localhost:1527/IDDB [ on APP]
3. Check whether the node icon is displayed as broken node. Then it’s disconnected. Otherwise you need to right click on the node and select Disconnect. Obviously it is our application that should initiate this connection during its execution. (Actually it is not necessary to disconnect the connection if it’s already connected. But we can understand what happens behind the scene)
4. Next you should start the Java DB server if it is not started yet. This is because Server should be able to listen for a database connection request made by applications. To start the server, right click on Java DB in the Services window. From the menu that appears, click Start Server. If your firewall needs your permission for this, you should allow the connection.
5. Then you need to add a client driver so that driver manager can make a connection with our database. This driver is sprcific to each database type
eg. mysql,Java DB
Accordingly, you are going to add the driver that supports Java DB type database.
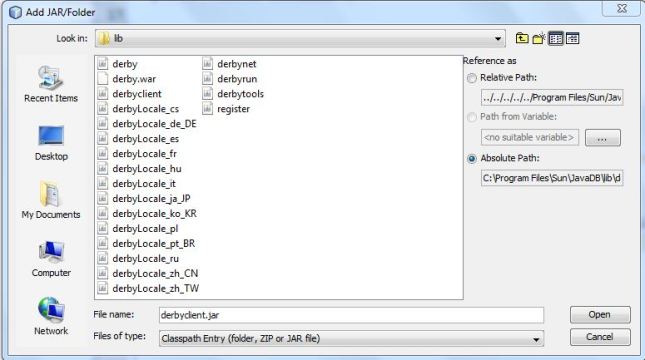
In Projects tab right click on Libraries and select Add JAR/Folder. In a Windoes, you can find the driver at
C:\Program Files\Sun\JavaDB\lib\derbyclient.jar
Locate this jar file and click Open. It will appear in your Libraries folder.
5. Enter the following code into your main method.
 public static void main(String[] args)
 {
 try
 {
 String url = "jdbc:derby://localhost:1527/IDDB";
 String username = "";
 String password = "";
 Connection con = DriverManager.getConnection(url ,username, password);
 }
 catch(SQLException ex)
 {
 System.out.println(ex.getMessage());
 }
 }
In the above code, we have created a connection object for our database.
If everything is OK Run the project.
If you encounter following errors please go back and recheck above steps carefully.
“java.net.ConnectException : Error connecting to server localhost on port 1527 with message Connection refused: connect.” >>
There ‘s a problem with connecting to the server.
“No suitable driver found for jdbc:derby://localhost:1527/Employees” >>
There ‘s a problem with adding derby driver.
6. Now you have the database connection. Threfore you can write SQL queries for manipulating data in the database.
First we try to pull all the data from the table. It will be easier in your side to have some records in your database table.
Enter the following code.
Statement stmt = con.createStatement();
 ResultSet rs = stmt.executeQuery("SELECT * FROM TBL_ACCOUNTS");

while(rs.next())
 {
 int id = rs.getInt(1);
 String uname = rs.getString(2);
 String pw = rs.getString(3);
 System.out.println(id + " " + uname + " " + pw);

}
You should have a Statement object to run SQL queries.
In Statement class, there ‘s a bunch of methods such as execute(), executeQuery(), executeUpdate()
In this example we need to pull data from the table. We need to use a SELECT query. So the preferred method is the executeQuery() which returns a resultSet object.
Now you should extract whatever you need from the ResultSet.
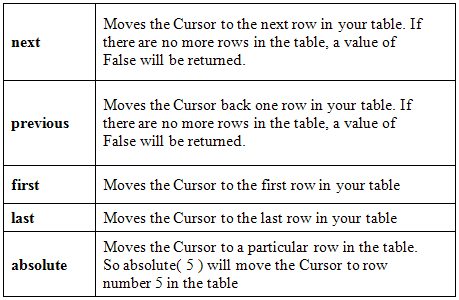
Here comes the Cursor concept. Cursor is a pointer to record in a table. But the idea is to identify a particular row in your table. We can control the position of the Cursor with the help of some predefined methods.
Just think the ResultSet as a table and there ‘s the Cursor pointing to one of its record. At first, cursor points to just before the first record when the data is loaded. The first call to next() causes the Cursoe to move the first record. The second call moves the Cursor to second row and so on.
ResultSet class provides methods to extract the data from each row.
In this way you can build a CRUD application which accesses Java DB as its database server. I ‘ll complete this tutorial series with my next post which includes a complete CRUD application.
Happy coding!


